0%

Gremlin学习笔记

Gremlin简介

Gremlin 是 Apache TinkerPop 框架下的图遍历语言,是目前图数据库领域主流的查询语言,Gremlin支持实时性高的OLTP以及多方面观察信息的OLAP。对于图数据库的Gremlin类似于针对关系型数据库的SQL

HugeGraph数据库

HugeGraph 是国内的一款开源图数据库,完全支持 Gremlin 语言。接下来将给大家讲讲如何在本地搭建一个可以执行 Gremlin 语言的HugeGraph 数据库

HugeGraphServer搭建

Step1 下载安装包并解压

Github的Releases中找到最新版本的hugegraph进行下载并解压

tar -zxvf hugegraph-x.x.x.tar.gz

Step2 配置参数

HugeGraphServer的默认配置已经能在大部分环境下直接使用了,并不需要修改,不过对于hugegraph-x.x.x的目录中的conf/rest-server.properties配置文件

# bind url
restserver.url=http://127.0.0.1:8080

# gremlin url to connect
gremlinserver.url=http://127.0.0.1:8182

# graphs list with pair NAME:CONF_PATH
graphs=[hugegraph:conf/hugegraph.properties]

# authentication
#auth.require_authentication=
#auth.admin_token=
#auth.user_tokens=[]

需要要介绍以下几个重要的配置项

  • restserver.url:HugeGraphServer对外提供RESTful API服务的地址,大家按需要可以修改其中的host和port部分。当host为127.0.0.1时只能在本机访问,因为后续介绍的HugeGraphStudio也是准备在本地启动的,所以这里不修改默认的host和port
  • graphs图名配置项的键值对列表,其中hugegraph:conf/hugegraph.properties表示通过HugeGraphServer可以访问到一个名为hugegraph的图实例,该图的配置文件路径为conf/hugegraph.properties。如果我们想访问别的图实例,那么不需要去修改图的配置文件,只需修改图的名字,这里仍然使用默认的配置即可

Step3 初始化后端

HugeGraphServer启动之前需要初始化后端,我们需要在hugegraph-x.x.x的目录下执行

bin/init-store.sh

从执行结果中可以看到hugegraph初始化了rocksdb后端,那为什么是rocksdb而不是别的呢?我们回到上一步说的conf/hugegraph.properties中的配置信息

# gremlin entrence to create graph
gremlin.graph=com.baidu.hugegraph.HugeFactory

# cache config
#schema.cache_capacity=1048576
#graph.cache_capacity=10485760
#graph.cache_expire=600

# schema illegal name template
#schema.illegal_name_regex=\s+|~.*

#vertex.default_label=vertex

backend=rocksdb
serializer=binary

store=hugegraph

# rocksdb backend config
#rocksdb.data_path=/path/to/disk
#rocksdb.wal_path=/path/to/disk

其中backend=rocksdb就是设置后端为rocksdb的配置项,其他可用的后端的还包括memory、cassandra、scylladb、hbase、mysql和palo

注意:

  • 初始化完成后,会在当前目录下出现一个rocksdb-data的目录,该目录就是用于存放后端数据的地方,没事千万不要随意删它或移动它
  • 初始化后端这个操作只需要在第一次启动服务前执行一次,不要每次起服务都执行。不过即使执行了也没关系,hugegraph检测到已经初始化了会自动跳过

Step4 启动服务

hugegraph-x.x.x的目录下执行

bin/start-hugegraph.sh

执行结果如上图表示执行成功,我们也可以通过查看jps查看HugeGraphServer是否启动成功

如果还不放心是否启动成功,我们还可以发个HTTP请求

curl http://127.0.0.1:8080/graphs

但如果执行时提示

那么需要先找到8080端口的进程,并将其kill掉

lsof -i :8080
kill -9 8080端口对应的PID

然后再次启动HugeGraphServer即可

HugeGraphStudio搭建

搭建步骤和前一部分HugeGraphServer搭建过程类似

Step1 下载安装包

Github的Releases中找到和hugegraph版本相近的压缩包进行下载并解压

tar -zxvf hugegraph-studio-x.x.x.tar.gz

Step2 配置参数

和之前一样不需要修改默认的配置参数,只需要注意在hugegraph-studio-x.x.x的目录中conf/rest-server.properties的配置信息中

studio.server.port=8088
studio.server.host=localhost

graph.server.host=localhost
graph.server.port=8080
graph.name=hugegraph

# the directory name released by react
studio.server.ui=ui
# the file location of studio-api.war
studio.server.api.war=war/studio-api.war
# default folder in your home directory, set to a non-empty value to override
data.base_directory=~/.hugegraph-studio

show.limit.data=250
show.limit.edge.total=1000
show.limit.edge.increment=20

# separator ','
gremlin.limit_suffix=[.V(),.E(),.hasLabel(STR),.hasLabel(NUM),.path()]

studio.server.port=8088studio.server.host=localhost分别表示访问HugeGraphStudio的port和host

Step3 启动服务

bin/hugegraph-studio.sh

HugeGraphStudio的启动默认是不会放到后台的,所以我们会在控制台上看到一大串日志,在最底下看到如下日志则表示启动成功

接下里我们按照日志中提示的信息,在浏览器中输入http://localhost:8088,就可以进入studio的界面

Gremlin常用语法

Gremlin 是一种函数式数据流语言,用Gremlin进行的操作是由一系列步骤组成,每一步都是作用在数据流上执行的一个原子操作

核心概念

名称 介绍
Schema 是一种描述语言,指所有属性和标签的集合
PropertyKey 属性,只有边和点可以使用属性;
VertexLabel 顶点标签,比如User,Car等;
EdgeLabel 边标签,比如know,use等;
Vertex 图中具体的顶点
Edge 图中具体的边,连接两个节点,分为有向边和无向边

图的创建

在 HugeGraphStudio 的输入框中输入以下Gremlin语句来创建一个TinkerPop关系图

Step1 创建属性

graph.schema().propertyKey("name").asText().ifNotExist().create()
graph.schema().propertyKey("age").asInt().ifNotExist().create()
graph.schema().propertyKey("addr").asText().ifNotExist().create()
graph.schema().propertyKey("lang").asText().ifNotExist().create()
graph.schema().propertyKey("tag").asText().ifNotExist().create()
graph.schema().propertyKey("weight").asFloat().ifNotExist().create()

Step2 创建顶点标签

graph.schema().vertexLabel("person").properties("name", "age", "addr", "weight").useCustomizeStringId().ifNotExist().create()
graph.schema().vertexLabel("software").properties("name", "lang", "tag", "weight").primaryKeys("name").ifNotExist().create()
graph.schema().vertexLabel("language").properties("name", "lang", "weight").primaryKeys("name").ifNotExist().create()

Step3 创建边标签

graph.schema().edgeLabel("knows").sourceLabel("person").targetLabel("person").properties("weight").ifNotExist().create()
graph.schema().edgeLabel("created").sourceLabel("person").targetLabel("software").properties("weight").ifNotExist().create()
graph.schema().edgeLabel("contains").sourceLabel("software").targetLabel("software").properties("weight").ifNotExist().create()
graph.schema().edgeLabel("define").sourceLabel("software").targetLabel("language").properties("weight").ifNotExist().create()
graph.schema().edgeLabel("implements").sourceLabel("software").targetLabel("software").properties("weight").ifNotExist().create()
graph.schema().edgeLabel("supports").sourceLabel("software").targetLabel("language").properties("weight").ifNotExist().create()

Step4 新增顶点

// 创建顶点
okram = graph.addVertex(T.label, "person", T.id, "okram", "name", "Marko A. Rodriguez", "age", 29, "addr", "Santa Fe, New Mexico", "weight", 1)
spmallette = graph.addVertex(T.label, "person", T.id, "spmallette", "name", "Stephen Mallette", "age", 0, "addr", "", "weight", 1)
tinkerpop = graph.addVertex(T.label, "software", "name", "TinkerPop", "lang", "java", "tag", "Graph computing framework", "weight", 1)
tinkergraph = graph.addVertex(T.label, "software", "name", "TinkerGraph", "lang", "java", "tag", "In-memory property graph", "weight", 1)
gremlin = graph.addVertex(T.label, "language", "name", "Gremlin", "lang", "groovy/python/javascript", "weight", 1)
dalaro = graph.addVertex(T.label, "person", T.id, "dalaro", "name", "Dan LaRocque ", "age", 0, "addr", "", "weight", 1)
mbroecheler = graph.addVertex(T.label, "person", T.id, "mbroecheler", "name", "Matthias Broecheler", "age", 29, "addr", "San Francisco", "weight", 1)
titan = graph.addVertex(T.label, "software", "name", "Titan", "lang", "java", "tag", "Graph Database", "weight", 1)
javeme = graph.addVertex(T.label, "person", T.id, "javeme", "name", "Jermy Li", "age", 29, "addr", "Beijing", "weight", 1)
zhoney = graph.addVertex(T.label, "person", T.id, "zhoney", "name", "Zhoney Zhang", "age", 29, "addr", "Beijing", "weight", 1)
linary = graph.addVertex(T.label, "person", T.id, "linary", "name", "Linary Li", "age", 28, "addr", "Wuhan. Hubei", "weight", 1)
hugegraph = graph.addVertex(T.label, "software", "name", "HugeGraph", "lang", "java", "tag", "Graph Database", "weight", 1)

Step5 新增边

okram.addEdge("created", tinkerpop, "weight", 1)
okram.addEdge("created", titan, "weight", 1)
okram.addEdge("knows", spmallette, "weight", 1)
tinkerpop.addEdge("define", gremlin, "weight", 1)
tinkerpop.addEdge("contains", tinkergraph, "weight", 1)
hugegraph.addEdge("implements", tinkerpop, "weight", 1)
hugegraph.addEdge("supports", gremlin, "weight", 1)
javeme.addEdge("knows", zhoney, "weight", 1)
javeme.addEdge("knows", linary, "weight", 1)
titan.addEdge("implements", tinkerpop, "weight", 1)
titan.addEdge("supports", gremlin, "weight", 1)
dalaro.addEdge("created", titan, "weight", 1)
dalaro.addEdge("knows", mbroecheler, "weight", 1)
tinkergraph.addEdge("supports", gremlin, "weight", 1)
javeme.addEdge("created", hugegraph, "weight", 1)
zhoney.addEdge("created", hugegraph, "weight", 1)
linary.addEdge("created", hugegraph, "weight", 1)
mbroecheler.addEdge("created", titan, "weight", 1)
spmallette.addEdge("created", tinkerpop, "weight", 1)

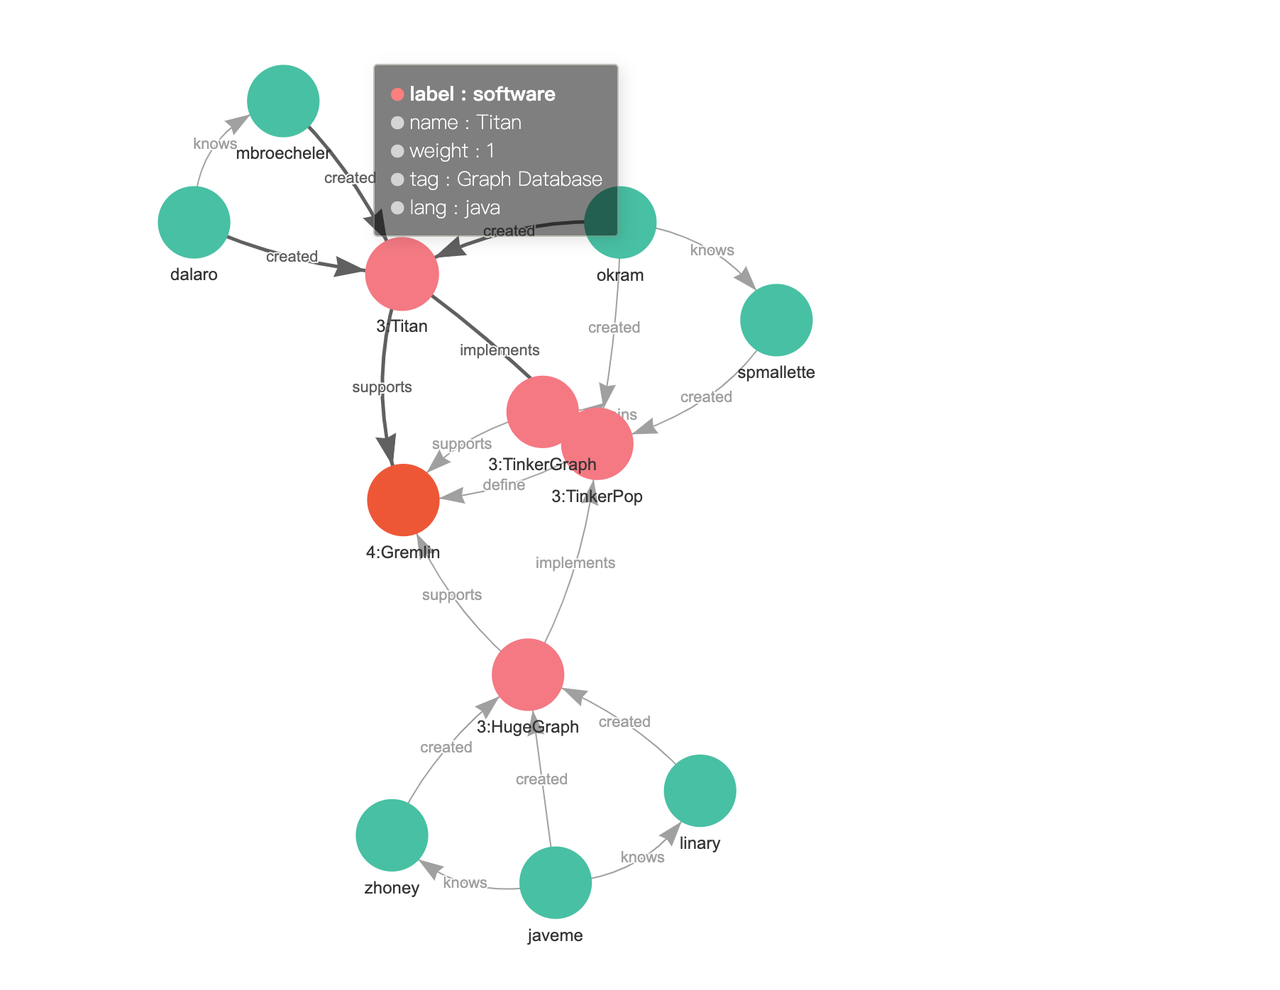
点击界面右上角的三角按钮,就可以创建出一个完整的图

图的查询

图的创建主要用graph语句,图的查询主要用g语句,g就相当于graph.traversal()

Step1 展示整个图

// 查出图的所有顶点和边。
g.V()

Step2 查询点

g.V().limit(5)                    // 查询所有点,但限制点的返回数量为5    
g.V().range(2,8) // 返回range区间长度的点数量
g.V().hasLabel('person') // 查询顶点标签为'person'的点
g.V('javeme') // 查询顶点id为‘dalaro’的点。

g.V().limit(3).out() // 查询顶点out方向的所有邻接点
g.V().limit(3).out('created') // 遍历边label='created'来查询顶点out方向的邻接点

g.V().limit(3).in() // 查询顶点in方向的所有邻接点
g.V().limit(3).in('created') // 遍历边label='created'来查询顶点in方向的邻接点

g.V().limit(3).both() // 查询顶点的所有双向(in或者out)邻接点
g.V().limit(3).both('created') // 遍历边label='created'来查询顶点的双向(in或者out)邻接点

g.E().limit(3).outV() // 访问所有边的出顶点,出顶点是指边的起始顶点
g.E().limit(3).inV() // 访问所有边的入顶点,入顶点是指边的目标顶点,也就是箭头指向的顶点
g.E().limit(3).bothV() // 访问所有边的双向(in或者out)顶点

g.V('600').drop() // 删除ID为600的点。

Step3 查询边

g.E()                         		// 查询所有边,当边数过大时不推荐使用
g.E('Sokram>1>>Sspmallette') // 查询边id为‘Sokram>1>>Sspmallette’的边
g.E().hasLabel('knows') // 查询边label为‘knows’的边
g.V('okram').outE('knows') // 查询顶点id为‘okram’且边label为‘knows’的边。
g.E('501-502-0').drop() //删除ID为“501-502-0”的边。

g.V().limit(3).outE() // 查询顶点out方向的所有邻接边
g.V().limit(3).outE('created') // 遍历边label='created'来查询顶点out方向的邻接边

g.V().limit(3).inE() // 查询顶点in方向的所有邻接边
g.V().limit(3).inE('created') // 遍历边label='created'来查询顶点in方向的邻接边

g.V().limit(3).bothE() // 查询顶点的所有双向邻接边
g.V().limit(3).bothE('created') // 遍历边label='created'来查询顶点的双向邻接边

Step4 查询属性

g.V().limit(3).values()            // 查询3个点的所有属性, 没有key, 只有value
g.V().limit(3).values('name') // 查询3个点的name属性, 没有key, 只有value
g.V().limit(3).valueMap() // 查询3个点的所有属性, 既有key, 又有value
g.V().limit(3).valueMap('name') // 查询3个点的name属性, 既有key, 又有value
g.V().limit(3).properties() // 查询3个点的所有属性, 和valueMap很像,但是将valueMap里面的顶点属性拍平
g.V().limit(3).properties('name') // 查询3个点的name属性
g.V().limit(3).properties().key()
g.V().limit(3).properties().value()// 等价于g.V().limit(3).values()

g.E().limit(3).values() // 查询3条边的所有属性, 没有key, 只有value
g.E().limit(3).values('name') // 查询3条边的name属性, 没有key, 只有value
g.E().limit(3).valueMap() // 查询3条边的所有属性, 既有key, 又有value
g.E().limit(3).valueMap('name') // 查询3条边的name属性, 既有key, 又有value
g.E().limit(3).properties() // 查询3条边的所有属性, 和EalueMap很像,但是将EalueMap里面的边属性拍平
g.E().limit(3).properties('name') // 查询3条边的name属性
g.E().limit(3).properties().key() // 查询3条边的所有属性
g.E().limit(3).properties().value()// 等价于g.V().limit(3).keys()

Step5 查询label

g.V().limit(3).label()             // 查询3个顶点的label 
g.V().limit(3).hasLabel('person') // 查询3个顶点中label=person的顶点

g.E().limit(3).label() // 查询3条边的label
g.E().limit(3).hasLabel('person') // 查询3条边中label=person的边

Step6 查询路径

举例:查询 Titan 顶点到与其有两层关系的顶点的不含环路的路径

// path 表示遍历过的所有路径
// simplePath 表示过滤掉路径中含有环路的对象,只保留路径中不含有环路的对象
// cyclicPath 表示过滤掉路径中不含有环路的对象,只保留路径中含有环路的对象
g.V().hasLabel('software').has('name','Titan').both().both().simplePath().path()

Step7 查询迭代

例1: 遍历所有点的出边直到抵达无出边的顶点,输出其路径顶点名

// repeat().until() 等同 do while 循环
// until().repeat() 等同 while do 循环
g.V().repeat(out()).until(outE().count().is(0)).path().by('name')

例2: 遍历所有点的3度可达点的路径

// loops 表示当前循环的次数
g.V().repeat(out()).until(loops().is(3)).path()

Step8 查询进阶

// 转换操作
g.V('2:Titan').in('created').map(values('name')) // 查询 2:Titan 的所有入顶点的name属性值
g.V('titan').in('created').flatMap(outE()) // 查询 2:Titan 的所有入顶点的出边

// 排序操作
g.V().values('name').order() // 默认升序排列
g.V().hasLabel('person').order().by('age', asc).values('name') // 按照元素属性age值升序排列,并只输出姓名

// 判断操作
g.V().values('age').is(28) // 选出顶点属性“age”=28的属性值
g.V().and(outE('supports'), outE('created')).values('name') // 选出同时包含出边为“supports”和“created”的顶点的name
g.V().where(outE('knows').and().outE('created')).values('name') // 使用where语句等价上面的功能
g.V().not(hasLabel('person')).label() // 筛选出所有label=“person”的顶点的label
g.V().hasLabel('person').and(outE('created').count().is(lte(1)), values("age").is(P.not(P.eq(28)))).values('name') //获取所有最多只有一条“created”边并且年龄不等于28的“person”顶点

// 统计操作
g.V().hasLabel('person').map(outE('created').count()).mean() // 计算所有“person”的“created”出边数的均值
g.V().hasLabel('person').map(outE('created').count()).max() // 计算所有“person”的“created”出边数的最大值
g.V().hasLabel('person').map(outE('created').count()).min() // 计算所有“person”的“created”出边数的最小值
g.V().hasLabel('person').map(outE('created').count()).count() // 计算所有“person”的“created”出边数的个数
g.V().hasLabel('person').map(outE('created').count()).sum() // 计算所有“person”的“created”出边数的求和

// 分支操作
g.V().hasLabel('person').choose(values('age').is(lte(30)),__.in(),__.out()).values('name') // 类似if -else

// 类似if-elif-else
// 查找所有的“person”类型的顶点
// 如果“age”属性等于0,输出名字
// 如果“age”属性等于28,输出年龄
// 如果“age”属性等于29,输出他开发的软件的名字
g.V().hasLabel('person')
.choose(values('age'))
.option(0, values('name'))
.option(28, values('age'))
.option(29, __.out('created').values('name'))
.option(none, values('name'))